Πολλοί από τους χρήστες αντιμετωπίζουν ένα πρόβλημα όπου το Steam αποτυγχάνει να κατεβάσει την ώρα σας. Προτρέπει ότι οι διακομιστές περιεχομένου δεν είναι προσβάσιμοι για λήψη. Είναι ασφαλές να πούμε ότι αυτό το πρόβλημα δεν προκαλείται από κανένα πρόβλημα, ιδίως λόγω πολλών ρυθμίσεων των χρηστών. Έχουμε αναφέρει μερικές από τις λύσεις που περιλαμβάνουν όλες τις μεθόδους από το Steam Support καθώς και από τους χρήστες.

Λύση 1: Κατάργηση των ρυθμίσεων διακομιστή μεσολάβησης
Ένας διακομιστής μεσολάβησης χρησιμοποιείται σε οργανισμούς όπου η ανοικτή πρόσβαση στο Διαδίκτυο είναι περιορισμένη. Ένας διακομιστής μεσολάβησης χρησιμοποιείται για την παρακολούθηση του δικτύου και την παροχή μιας εναλλακτικής πύλης στους χρήστες. Οι ρυθμίσεις διακομιστή μεσολάβησης συχνά γίνονται εμπόδιο όταν το Steam προσπαθεί να συνδεθεί στους διακομιστές του για λήψη.
Υπάρχουν δύο τρόποι απενεργοποίησης του διακομιστή μεσολάβησης στον υπολογιστή σας.
Μέθοδος 1: Chrome
- Ανοίξτε το πρόγραμμα περιήγησης Chrome και κάντε κλικ στο μενού του Chrome (πάνω δεξιά) κατά το άνοιγμα.

- Αφού έρθει το αναπτυσσόμενο μενού, κάντε κλικ στο Ρυθμίσεις .

- Μόλις ανοίξει η σελίδα Ρυθμίσεις, πληκτρολογήστε " διακομιστής μεσολάβησης " στη γραμμή διαλόγου που υπάρχει στην κορυφή.

- Από τα αποτελέσματα αναζήτησης, επιλέξτε το αποτέλεσμα που λέει " ανοιχτές ρυθμίσεις διακομιστή μεσολάβησης ".

- Όταν ανοίξουν οι ρυθμίσεις, κάντε κλικ στο " Ρυθμίσεις LAN " στην καρτέλα Συνδέσεις, που υπάρχει στο κάτω μέρος.

- Καταργήστε την επιλογή της γραμμής που λέει " Αυτόματη ανίχνευση ρυθμίσεων ". Αποθηκεύστε τις αλλαγές και βγείτε. Επανεκκινήστε το Steam.

Μέθοδος 2: Μέσω των ρυθμίσεων δικτύου
- Πατήστε το κουμπί Windows + R για να εμφανιστεί η εφαρμογή Εκτέλεση.
- Στο πλαίσιο διαλόγου, πληκτρολογήστε "inetcpl. cpl ".

- Θα ανοίξουν οι ιδιότητες διαδικτύου. Μεταβείτε στην καρτέλα Συνδέσεις και κάντε κλικ στις ρυθμίσεις LAN.
- Μόλις μεταβείτε στις ρυθμίσεις LAN, καταργήστε την επιλογή της γραμμής που λέει " Αυτόματη ανίχνευση ρυθμίσεων" . Αποθηκεύστε τις αλλαγές και βγείτε για επανεκκίνηση του Steam.
Λύση 2: Απενεργοποίηση επεκτάσεων Chrome
Μερικές φορές, οι επεκτάσεις που υπάρχουν στο Chrome μπορούν να δημιουργήσουν ένα πραγματικό εμπόδιο. Επηρεάζουν τις ρυθμίσεις του δικτύου σας, ειδικά το πρόσθετο που ονομάζεται " Ghostery ". Παρακολουθεί το δίκτυό σας και παρέχει στατιστικά στοιχεία όπου αφήνετε το ψηφιακό σας αποτύπωμα. Σας δίνει ακόμη και έλεγχο σε ποιους ιστότοπους μπορούν να έχουν πρόσβαση στα δεδομένα σας που δεν μπορούν. Συνιστάται να απενεργοποιήσετε αυτά τα πρόσθετα από το Chrome πριν συνεχίσετε τη λήψη. Εάν το πρόβλημα προκλήθηκε από αυτούς, θα επιλυόταν.
Αυτό δεν περιλαμβάνει μόνο τις επεκτάσεις Chrome, θα πρέπει να απενεργοποιήσετε ΟΠΟΙΟΔΗΠΟΤΕ πρόγραμμα που σχετίζεται με το δίκτυό σας (οθόνη δεδομένων, VPN κ.λπ.) Είναι καλύτερα να δοκιμάσετε παρά να προχωρήσετε με τις περαιτέρω λύσεις που είναι πιο περίπλοκες.

Λύση 3: Αλλαγή της περιοχής λήψης
Μία από τις βασικές διορθώσεις περιλαμβάνει την αλλαγή της περιοχής λήψης.
Το σύστημα περιεχομένου Steam χωρίζεται σε διαφορετικές περιοχές. Ο πελάτης εντοπίζει αυτόματα την περιοχή σας μέσω του δικτύου σας και την ορίζει ως προεπιλογή. Μερικές φορές, οι διακομιστές σε μια συγκεκριμένη περιοχή ενδέχεται να είναι υπερφορτωμένοι ή ενδέχεται να υποστούν αποτυχία υλικού. Έτσι, η αλλαγή της περιοχής λήψης μπορεί να λύσει το εν λόγω πρόβλημα. Μπορείτε πάντα να δοκιμάσετε να αλλάξετε τις περιοχές λήψης πολλές φορές (δεν περιορίζεται μόνο σε μία δοκιμή) προτού προχωρήσετε σε περαιτέρω λύσεις.
- Ανοίξτε το Steam και κάντε κλικ στο « Ρυθμίσεις » στο αναπτυσσόμενο μενού στην επάνω αριστερή γωνία του παραθύρου.
- Επιλέξτε « Λήψεις » και πλοηγηθείτε στο « Λήψη περιοχής ».
- Επιλέξτε άλλες περιοχές εκτός από τη δική σας και επανεκκινήστε το Steam.

Λύση 4: Διαγραφή clientregistry.blob
Το μητρώο πελατών του Steam ενδέχεται να καταστραφεί και αυτός μπορεί να είναι ο λόγος για τον οποίο αντιμετωπίζετε το σφάλμα. Μπορούμε να δοκιμάσουμε τη μετονομασία / διαγραφή του.
- Κλείστε πλήρως το Steam και τερματίστε όλες τις εργασίες όπως αναφέρονται στην παραπάνω λύση.
- Περιηγηθείτε στον κατάλογο Steam. Το προεπιλεγμένο είναι C: \ Program Files \ Steam .
- Εντοπίστε το " clientregistry.blob" .

- Μετονομάστε το αρχείο σε " clientregistryold.blob " (ή μπορείτε να διαγράψετε πλήρως το αρχείο).
- Επανεκκινήστε το Steam και αφήστε το αρχείο να αναδημιουργηθεί.
Ας ελπίσουμε ότι ο Πελάτης σας θα λειτουργήσει όπως αναμενόταν. Εάν εξακολουθεί να μην λειτουργεί, ακολουθήστε τα παρακάτω βήματα.
- Περιηγηθείτε ξανά στον κατάλογο Steam.
- Εντοπίστε το Steamreporter. exe ».

- Εκτελέστε την εφαρμογή και επανεκκινήστε το Steam.
Λύση 5: Εκκαθάριση της ουράς λήψης του Steam
Εάν έχετε πολλές εκκρεμείς λήψεις στο πρόγραμμα-πελάτη Steam, συνιστάται να τις αφαιρέσετε όλες εκτός από μία και να επανεκκινήσετε το Steam.
- Ανοίξτε το Steam πρόγραμμα-πελάτη σας στην καρτέλα Βιβλιοθήκη .
- Στο κάτω μέρος, θα δείτε μια επιλογή με δυνατότητα κλικ με την ένδειξη " Λήψη σε παύση ". Κάντε κλικ για να εμφανιστούν όλες οι επιλογές που βρίσκονται στην ουρά.

- Κάντε ένα προς ένα το κουμπί όπως φαίνεται στην παρακάτω εικόνα για να αφαιρέσετε τα στοιχεία από την ουρά.

- Once you have removed them, right click on games (except the one which you want to download first) so the settings come forward. Once the Settings open, click on “Uninstall” button.

- Steam will prompt you to confirm your actions. Click Delete when the prompt comes forward and restart Steam before trying to download that one game again.

Solution 6: Using flush config
We can try running the flush config command to reset the configuration. Follow the steps below.
- Press Windows + R to bring up the Run application.
- In the dialogue bar, type “steam://flushconfig”.

- Press OK. Steam will now pop a window to confirm your actions. Press Ok and restart Steam.

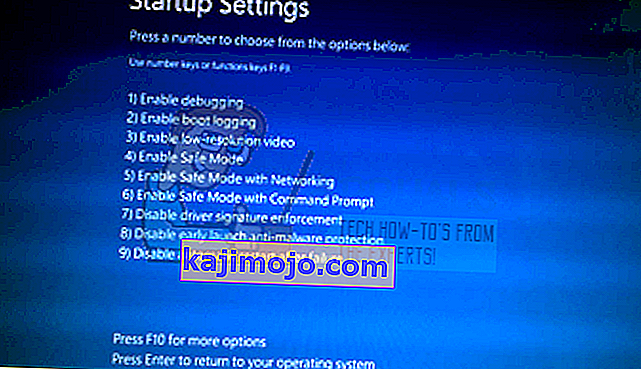
Solution 7: Starting Steam in Safe mode with networking.
Before resorting to more technical methods, you can try running your PC in safe mode (with networking) and try to start the Steam download.
- Get your computer to safe mode by selecting from various options available. Select ‘Enable Safe Mode with Networking’. You can learn how to get your PC to safe mode from here. If you are running Windows 7, press F8 upon the startup of your PC and you will be directed to a similar window where you can select the required option.
- Open Steam and try updating/installing with it again. This method should remove all obstacles (if any) which your Steam may be experiencing.

Solution 8: Disabling Safe-web from router
Your WiFi router may have a setting called safe-web in it. What this does is filter all the incoming data it deems are not trustworthy. It is very common for it to flag Steam as one and disrupts the connection with your computer.
Since there are hundreds of different routers used by the users, it is very difficult to list the solution on how to disable the option for every one of them. Here are some guidelines so you can have an idea.
- Web Safe can be found in the parental control section on the WiFi router configuration.
- It can also be found on the Virus section or the Filtering section.
- To enter your router settings, type the IP which is associated with it (for example for some it is 192.168.1.1). You can check the required IP either by calling your modem provider or by looking at the back of the device ( even its packaging box may have details).
Solution 9: Disabling Anti-virus and Defender/firewall
Before proceeding to reinstall Steam, we can try meddling with the antivirus. Antivirus monitors each packet of your computer sends and receives. Although Steam has collaborated with most of them so they don’t give problems, sometimes they do. The solution is to disable/uninstall them and check if you are able to download then.
McAfee Antivirus:
McAfee has no way to exclude certain files from its real time scanning. The only way is to disable the antivirus entirely until the game is updated. To do this, open McAfree and select “Virus and Spyware Protection”. Here you find the option of “Real-Time Scanning”. Click that option and turn it off.

Then follow the following instruction to verify integrity of game files.
- Restart your computer and relaunch Steam.
- Head over to the library section and right click on the game which is giving you problems.
- Click on its properties and select the local files tab.
- Click the verify integrity of game files button and Steam will verify that game in a few minutes.
Hopefully, after performing the above steps, your Steam won’t give any issue.

ESET NOD32
NOD32 has the tendency to mark some application files as malicious and will most probably quarantine it. This often results in the error while updating a game. Browse to your current Steam directory and copy the address
- The default location for your steam folder should be “C:\Program Files (x86)\Steam”.
Press ⊞ Win + R button. This should pop-up the Run application.
In the dialogue box write “C:\Program Files (x86)\Steam”.

Or if you installed Steam in another directory, you can browse to that directory and you can proceed with steps mentioned below.
After copying the address open ESET NOD32 and paste the location in exclude from real time scanning.
Follow the ‘verify integrity of game files’ method listed above and you will be all good.

Kaspersky AV
Kaspersky may sometimes flag Steam as an intruder and disable it from making any changes to the hard drive. To fix this, head over to ‘threats and exclusions’. Navigate to ‘trusted zone’ and add Steam.exe as a trusted application. Remember to change the settings to Do not restrict application activity as well as Do not scan opened files.
Follow the ‘verify integrity of game files’ method listed above and restart your computer.

Windows Defender
- Click Windows button and in the search bar type “Windows defender”. Among all the options, there will be an application named “Windows Defender Security Center”. Open it.
- Upon opening, you will find a list of options available in the new window. Select the option “Virus and threat protection”.

- Upon entering the menu, navigate to Virus and Threat Protection Settings. Windows may prompt you to allow administrator access to use this feature. If so, press Yes.

- After entering the required menu, you should search the window which says “Add or remove exclusions”. Click it and you will be navigated to a menu where you can add exclusions. You can exclude folders, extensions, and even files. In this case, we will exclude the whole Steam folder which is located in the directory you downloaded it.

- Click on the option which says “Exclude a folder” and navigate to your Steam directory. The default location for your steam folder should be “C:\Program Files (x86)\Steam”. Once you reach the location select the folder and save changes.
- Restart your computer and run Steam with administrative privileges. Hopefully, your speed issue will be resolved.
Solution 10: Downloading Latest Steam Client
- The default location for your steam folder should be “C:\Program Files (x86)\Steam”.
Press ⊞ Win + R button. This should pop-up the Run application.
In the dialogue box write “C:\Program Files (x86)\Steam”.

Or if you installed Steam in another directory, you can browse to that directory and you can proceed with steps mentioned below.
- Locate the following folders:
Steam.exe (Application)SteamApps (Folder)Userdata (Folder)
- Delete all the other files/folders/applications except the ones mentioned above.
- Head over to the Steam website and download the latest Steam client. Don’t launch the old Steam.exe present in your directory at all. The problem won’t be solved.
- Install Steam using the installer in the same directory as your previous one. Hopefully, after installation, the problem will be solved.
Solution 11: Changing Default Browser
In a weird turn of events, having Chrome or any other browser set as the default browser sometimes causes issues with the download request that Steam sends to its servers. Therefore, in this step, we will be setting internet explorer as our default browser temporarily to make sure that the download proceeds. For that:
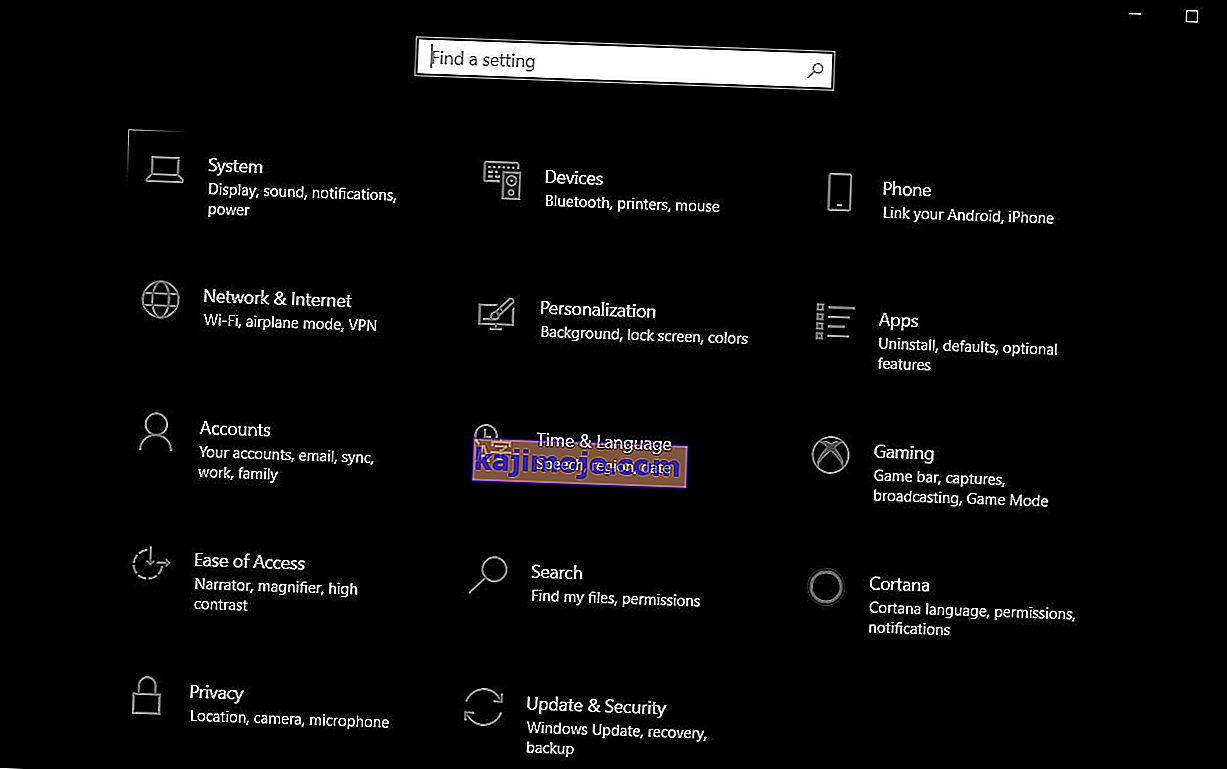
- Press “Windows’ + “I” to open settings.
- In settings, click on “Apps” and then select “Default Apps” from the left pane.
- Click on the “Web browser” option and then select “Internet Explorer” from the list.
- Open Steam and check to see if the issue persists.

Solution 12: Removing Steam Content Server Limiter
In certain cases, it was shown that uninstalling Steam Content Server Limiter from the Classical Control Panel interface fixes this issue for a lot of people. Therefore, in this step, we will be doing exactly that. For that:
- Press “Windows’ + “R” to open the Run prompt.
- Type in “Control” and press “Enter”.

- Click on the “Uninstalla Program” option and then right-click on the “Steam Content Server Limiter” and select “Uninstall”.
- After the server limiter is uninstalled, check to see if the issue persists.

Method 13: Changing DNS
In certain situations, the server DNS that the computer is using to communicate with the internet might not be compatible either with the steam servers or it might be facing issues temporarily. Therefore, in this step, we will be changing our DNS servers. For that;
- Press “Windows’ + “R” to open the Run prompt.
- Type in “ncpa.cpl” and press “enter”.

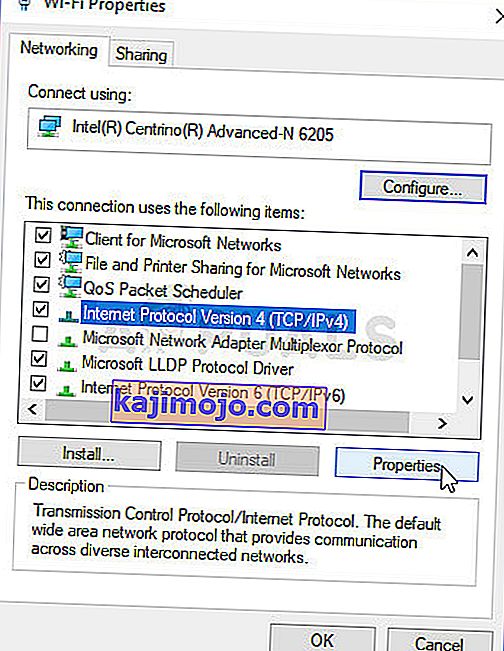
- Right-click on your network adapter and select “Properties”.
- In properties, double click on the “Internet Protocol Version 4(TCP/IPV4)” option and check the “Use following DNS Addresses” option.
- Type in “8.8.8.8” in the primary DNS address and “8.8.4.4” in the secondary DNS address.
- Click on “OK” and then check to see if the issue persists. If it does, try using “1.1.1.1” and “1.0.0.1” in the fields respectively.


Method 14: Changing Config File
In certain situations, the config file on the computer might require some editing in order to get it some games to start working. The steps listed below are primarily for Mac but you can try them on some older OS such as Windows XP too as some users reported that this fixed it for them.
- Open the Mac Finder and navigate to the following directory.
drive_c/Program Files/Steam/config/
- Launch the “config.vdf” file and wait for it to open.
- Find the following text lines inside the file.
"InstallConfigStore" { "Software" { "Valve" { "Steam" "cip" - Paste the following lines of code under the “cip” entry in the config after creating a new line under it.
CS" "valve511.steamcontent.com;valve501.steamcontent.com;valve517.steamcontent.com;valve557.steamcontent.com;valve513.steamcontent.com;valve535.steamcontent.com;valve546.steamcontent.com;valve538.steamcontent.com;valve536.steamcontent.com;valve530.steamcontent.com;valve559.steamcontent.com;valve545.steamcontent.com;valve518.steamcontent.com;valve548.steamcontent.com;valve555.steamcontent.com;valve556.steamcontent.com;valve506.steamcontent.com;valve544.steamcontent.com;valve525.steamcontent.com;valve567.steamcontent.com;valve521.steamcontent.com;valve510.steamcontent.com;valve542.steamcontent.com;valve519.steamcontent.com;valve526.steamcontent.com;valve504.steamcontent.com;valve500.steamcontent.com;valve554.steamcontent.com;valve562.steamcontent.com;valve524.steamcontent.com;valve502.steamcontent.com;valve505.steamcontent.com;valve547.steamcontent.com;valve560.steamcontent.com;valve503.steamcontent.com;valve507.steamcontent.com;valve553.steamcontent.com;valve520.steamcontent.com;valve550.steamcontent.com;valve531.steamcontent.com;valve558.steamcontent.com;valve552.steamcontent.com;valve563.steamcontent.com;valve540.steamcontent.com;valve541.steamcontent.com;valve537.steamcontent.com;valve528.steamcontent.com;valve523.steamcontent.com;valve512.steamcontent.com;valve532.steamcontent.com;valve561.steamcontent.com;valve549.steamcontent.com;valve522.steamcontent.com;valve514.steamcontent.com;valve551.steamcontent.com;valve564.steamcontent.com;valve543.steamcontent.com;valve565.steamcontent.com;valve529.steamcontent.com;valve539.steamcontent.com;valve566.steamcontent.com;valve165.steamcontent.com;valve959.steamcontent.com;valve164.steamcontent.com;valve1611.steamcontent.com;valve1601.steamcontent.com;valve1617.steamcontent.com;valve1603.steamcontent.com;valve1602.steamcontent.com;valve1610.steamcontent.com;valve1615.steamcontent.com;valve909.steamcontent.com;valve900.steamcontent.com;valve905.steamcontent.com;valve954.steamcontent.com;valve955.steamcontent.com;valve1612.steamcontent.com;valve1607.steamcontent.com;valve1608.steamcontent.com;valve1618.steamcontent.com;valve1619.steamcontent.com;valve1606.steamcontent.com;valve1605.steamcontent.com;valve1609.steamcontent.com;valve907.steamcontent.com;valve901.steamcontent.com;valve902.steamcontent.com;valve1604.steamcontent.com;valve908.steamcontent.com;valve950.steamcontent.com;valve957.steamcontent.com;valve903.steamcontent.com;valve1614.steamcontent.com;valve904.steamcontent.com;valve952.steamcontent.com;valve1616.steamcontent.com;valve1613.steamcontent.com;valve958.steamcontent.com;valve956.steamcontent.com;valve906.steamcontent.com"
- Save your changes and check to see if the issue persists.
Note: Some users reported to fix the issue after having to deleting the CM List IP addresses in the file aswell in addition to pasting this code.