Το Steam Cloud παρέχει έναν εύκολο και διαφανή τρόπο αποθήκευσης των δεδομένων του παιχνιδιού σας σε ένα απομακρυσμένο σύστημα αποθήκευσης. Τα αρχεία που καθορίζονται στη διαμόρφωση Auto-Cloud ή εάν είναι εγγεγραμμένα στο δίσκο θα αναπαραχθούν αυτόματα στους διακομιστές cloud Steam (χρησιμοποιώντας το Cloud API) μετά την ύπαρξη του παιχνιδιού.

Αυτό είναι ιδιαίτερα χρήσιμο εάν ο χρήστης αλλάξει τον υπολογιστή του. Η πρόοδος του παιχνιδιού θα συνεχιστεί είτε από το Cloud API είτε από την ανάγνωση απευθείας από το δίσκο. Τα αρχεία θα ληφθούν αυτόματα πριν ξεκινήσει το παιχνίδι, καθώς θα έχετε ήδη εισαγάγει τα διαπιστευτήριά σας στο Steam. Η κύρια δουλειά του Steam Cloud είναι να διασφαλίσει ότι όλα τα αρχεία συγχρονίζονται σε όλους τους υπολογιστές που χρησιμοποιεί ένας χρήστης.
Οι χρήστες έχουν την επιλογή να απενεργοποιήσουν ολόκληρο το συγχρονισμό Cloud που υπάρχει στις ρυθμίσεις Steam του προγράμματος-πελάτη. Οι χρήστες έχουν επίσης την ευελιξία να απενεργοποιήσουν το συγχρονισμό Cloud ανά παιχνίδι. Ωστόσο, προτού προχωρήσετε με τις λύσεις, ενημερώστε τον πελάτη Steam στην πιο πρόσφατη έκδοση.
Ποιες είναι οι διαφορετικές μέθοδοι αξιοποίησης του Steam Cloud;
Το Steam προσφέρει δύο διαφορετικές μεθόδους για τη χρήση του Steam Cloud.
Πρώτα επάνω είναι το Steam Cloud API. Το Cloud API παρέχει μια σειρά λειτουργιών που σας επιτρέπουν να ενσωματώσετε απευθείας το Steam Cloud στο παιχνίδι σας. Το Cloud API επιτελεί επίσης την απομόνωση μεμονωμένων αρχείων χρήστη Steam το ένα από το άλλο και παρέχει επίσης καλύτερο έλεγχο στο Steam Cloud στο σύνολό του.
Το δεύτερο είναι το Steam Auto-Cloud. Αυτή η λειτουργία σχεδιάστηκε κυρίως για παιχνίδια παλαιού τύπου όπου ήταν δύσκολο να χρησιμοποιήσετε το Cloud API. Είναι ένας γρήγορος τρόπος για να ξεκινήσετε με το Steam Cloud, αλλά δεν διαθέτει την ευελιξία και την ισχύ που παρέχει το Steam Cloud API.
Συνιστάται από τους προγραμματιστές να χρησιμοποιούν το Cloud API αντί για το Steam Auto-Cloud καθώς παρέχει βαθύτερη και αποτελεσματική ενσωμάτωση και προσαρμογή. Σας επιτρέπει να αξιοποιήσετε στο έπακρο το Steam cloud.
Πώς μπορώ να επιλύσω μια σύγκρουση στο Steam Cloud;
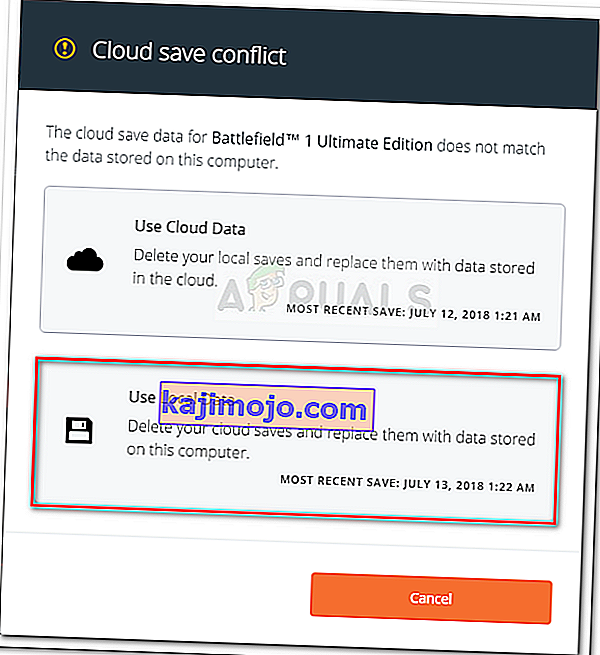
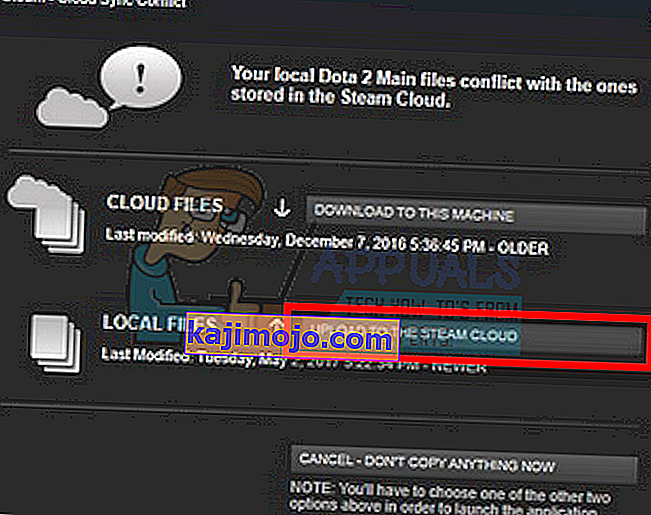
Μια διένεξη Steam Cloud προκύπτει όταν το περιεχόμενο Steam Cloud δεν ταιριάζει με τα τοπικά αρχεία παιχνιδιών που είναι αποθηκευμένα στον σκληρό σας δίσκο. Αυτό μπορεί να συμβεί στο μηχάνημα που χρησιμοποιούσατε εκείνη τη στιγμή ή στο παρελθόν σε άλλο μηχάνημα. Επειδή το αρχείο τροποποιήθηκε σε δύο διαφορετικές τοποθεσίες χωρίς συγχρονισμό μεταξύ τους, το Steam δεν μπορεί να καθορίσει ποιο αρχείο θα διατηρήσει.

Πιθανότατα θα επιλέξετε το αρχείο που τροποποιήθηκε πιο πρόσφατα. Αυτό σημαίνει ότι οι τελευταίες εξελίξεις στο παιχνίδι σας θα αποθηκευτούν. Θα πρέπει να ελέγξετε προσεκτικά τα δεδομένα που προεπισκοπήθηκαν στο παράθυρο. Ελέγξτε προσεκτικά την ημερομηνία και την ώρα του περιεχομένου και αντιστοιχίστε το με την τελευταία φορά που παίξατε ένα παιχνίδι στο Steam. Αυτό το πλαίσιο μπορεί να σας βοηθήσει στον καθορισμό της έκδοσης που πρέπει να διατηρήσετε.
Λάβετε υπόψη ότι το να παίζετε παιχνίδια σε λειτουργία εκτός σύνδεσης θα αποτρέψει το συγχρονισμό των παιχνιδιών σας και αυτή είναι η πιο πιθανή αιτία της διένεξης στο Steam Cloud.
Τι γίνεται αν το Steam δεν είναι σε θέση να συγχρονίσει αρχεία στο Cloud;
Αυτό το σφάλμα δείχνει ότι το Steam δεν μπόρεσε να συγχρονίσει τα τοπικά αρχεία σας με το Steam Cloud. Μπορεί να είναι ένα προσωρινό πρόβλημα που ενδέχεται να αντιμετωπίζουν οι διακομιστές Steam Cloud. Μπορείτε να ελέγξετε την κατάσταση του Steam Cloud από τον ιστότοπο του Steam για να βεβαιωθείτε ότι το πρόβλημα βρίσκεται στο πλευρό τους.

Εάν η υπηρεσία Steam cloud λειτουργεί και λειτουργεί τέλεια, αυτό σημαίνει ότι το πρόβλημα είναι στο τέλος σας. Θα μπορούσατε να ελέγξετε τη σύνδεσή σας στο Steam και να αντιμετωπίσετε προβλήματα. Μπορείτε επίσης να ελέγξετε εάν μόνο έχετε προβλήματα με τον συγχρονισμό με το Steam Cloud.
Εάν αγνοήσετε το μήνυμα και κάνετε κλικ στο "Παίξτε παιχνίδι", θα μπορούσε να προκαλέσει πιθανή διένεξη μεταξύ των τοπικών αρχείων σας και του Steam Cloud. Μπορεί επίσης να οδηγήσει σε χαμένη πρόοδο και δεδομένα παιχνιδιού.
Τι γίνεται αν χάσω ένα αρχείο ή μια πρόοδο μετά τη μετάβαση σε διαφορετικό υπολογιστή;
Εάν λείπει η πιο πρόσφατη πρόοδός σας και έχετε ελέγξει ξανά ότι το παιχνίδι χρησιμοποιεί το Steam Cloud χρησιμοποιώντας τις Ρυθμίσεις, αυτό σημαίνει ότι είτε το Steam δεν μπόρεσε να συγχρονίσει τα δεδομένα σας με επιτυχία είτε ο συγχρονισμός είχε ως αποτέλεσμα τη μεταφόρτωση των προηγούμενων δεδομένων σας στο Σύννεφο.
Είναι πιθανό το αρχικό σας αρχείο ή η πρόοδος να εξακολουθεί να βρίσκεται στον παλαιότερο υπολογιστή και να μην ήταν δυνατό να συγχρονιστεί. Είναι πιθανό εάν εκκινήσετε το Steam σε αυτόν τον υπολογιστή, θα εμφανιστεί η πρόοδός σας. Εάν συμβαίνει αυτό, θα ενημερωθεί αυτόματα σε όλα τα άλλα μηχανήματα που είναι συνδεδεμένα με το λογαριασμό σας στο Steam.
Επίσης, πολλά παιχνίδια δεν χρησιμοποιούν την εγκατάσταση του Steam Cloud. Μπορείτε να ελέγξετε την επίσημη σελίδα του παιχνιδιού εάν είναι διαθέσιμη η υποστήριξη Steam Cloud. Εάν δεν είναι και δεν έχετε πρόσβαση στο παλαιότερο μηχάνημα, αυτό σημαίνει ότι η πρόοδός σας έχει χαθεί και δεν υπάρχει τρόπος να το ανακτήσετε.
Πώς να διαγράψετε αρχεία που έχουν αποθηκευτεί σε διακομιστές Steam Cloud;
Το Steam Cloud χρησιμοποιείται για τη δημιουργία αντιγράφων ασφαλείας κάθε προόδου του παιχνιδιού σας, ώστε να μην χάνετε την πρόοδό σας, εάν έχετε πρόσβαση στο παιχνίδι από οποιονδήποτε άλλο υπολογιστή. Μπορείτε να επιβεβαιώσετε ότι η πρόοδός σας αποθηκεύεται από το Cloud χρησιμοποιώντας την ακόλουθη μέθοδο.
Ελέγξτε εάν δημιουργείται αντίγραφο ασφαλείας του παιχνιδιού σας.
- Ανοίξτε το πρόγραμμα-πελάτη Steam . Ανοίξτε τις ρυθμίσεις του πατώντας το κουμπί Steam που βρίσκεται στην επάνω αριστερή γωνία του παραθύρου και επιλέγοντας την επιλογή
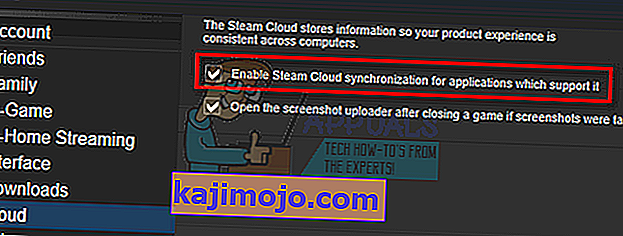
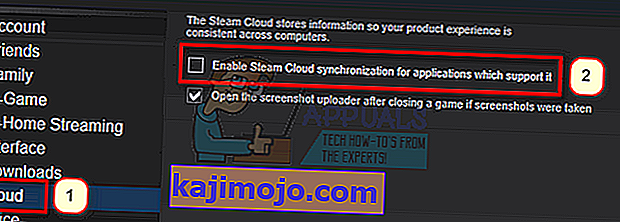
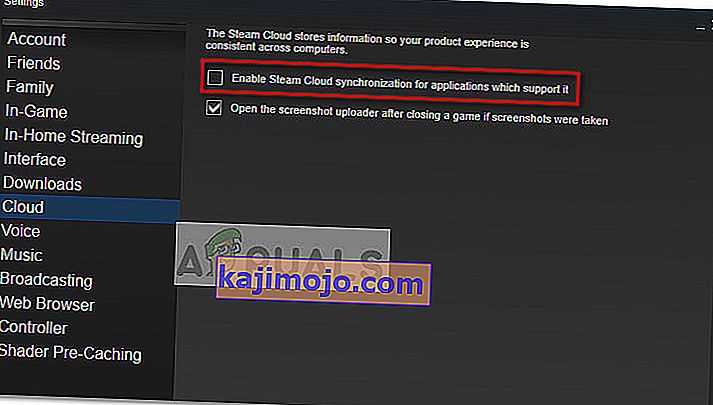
- Ανοίξτε την καρτέλα Cloud που υπάρχει στην αριστερή πλευρά της οθόνης. Ελέγξτε εάν έχει επιλεγεί η επιλογή " Ενεργοποίηση συγχρονισμού Steam Cloud για τις εφαρμογές που το υποστηρίζουν ".
- Στη συνέχεια κάντε κλικ στην καρτέλα Βιβλιοθήκη που βρίσκεται στην επάνω πλευρά του προγράμματος-πελάτη Steam. Εδώ θα εμφανίζονται όλα τα παιχνίδια σας.
- Κάντε δεξί κλικ στο παιχνίδι και επιλέξτε Ιδιότητες . Στη συνέχεια, μεταβείτε στην καρτέλα Ενημερώσεις που υπάρχει στο πάνω μέρος του παραθύρου.
- Εδώ στο κάτω μέρος του παραθύρου, θα δείτε μια επιλογή " Ενεργοποίηση συγχρονισμού Steam Cloud για [όνομα παιχνιδιού] ". Βεβαιωθείτε ότι η επιλογή είναι επιλεγμένη .


Εάν έχετε ενεργοποιήσει και τις δύο επιλογές, αυτό σημαίνει ότι το παιχνίδι σας υποστηρίζεται από το Steam Cloud και μπορούμε επίσης να διαγράψουμε τα δεδομένα.
Τι είναι ο μηχανισμός δημιουργίας αντιγράφων ασφαλείας;
Το πρώτο πράγμα που πρέπει να γνωρίζετε είναι ότι υπάρχουν τρεις εκδόσεις των αποθηκευμένων δεδομένων παιχνιδιού
- Η αρχική έκδοση αποθηκεύεται στο φάκελο του AppData ( D1 ).
- Η έκδοση cloud αποθηκεύεται στην τοποθεσία Steam / userdata / SteamID / AppID ( D2 ).
- Η έκδοση cloud που είναι αποθηκευμένη στους διακομιστές cloud του Steam ( D3 ).
Σημειώστε τους σχολιασμούς (D1, D2, D3) που χρησιμοποιήσαμε καθώς θα τους αναφερόμαστε πολύ στο μέλλον.
When you start the game for the first time, D1 is created automatically. After you are done playing the game, the game data is updated in D1 and automatically copied to D2. After this D2 is then synced to D3, thus uploading all of your game content.
If you start your game from another computer for the first time, if Steam has D3 on its servers but doesn’t detect D2 on the computer, it will automatically download the data and copy D3 to D2. Steam Cloud also automatically downloads the missing data whenever you start Steam.
In a nutshell, the most important data for us is D2. If we can manipulate it, we can successfully delete the data which you want to delete.
Note: Some games don’t have D1 and they directly save their data to D2. While some games don’t use D2 as a medium and upload the data to the Cloud directly from D1.
What Are the Userdata Contents?
In the directory Steam/userdata, you should have a folder corresponding to your SteamID (You check what your Steam ID is by reading our article on it). After you open it, there will folders made for each game that you play. They will be identified using their AppID (AppID can be easily checked by visiting the game in the Steam store and extracting it from the URL). In this game folder, you will find two entities.
- remotecache.vdf: This file describes all the properties of files that are contained in the remote folder.
- Remotefolder. This contains all the files which are synced with your Steam Cloud server.
Deleting Data from Cloud
In this method, we will be following two important steps. We will first bring up the Steam Cloud conflict notification and then delete the Cloud files.
Do note that you would have to follow these steps game by game to delete all of the Steam cloud content.
First, we need to delete the AppID folder from your Steam directory. After you restart your computer and Steam, Steam will automatically re-create the folder. We need to perform this step to ensure that the Steam Cloud is working perfectly and we can go ahead with the part of deletion.
- Open your Steam directory. The default location for your Steam installation is
C:\Program Files (x86)\Steam
- Search for a folder of AppID and Delete it. Then restart your computer and Steam. Start a game for a few minutes. Make sure that you have a working internet connection.
- Navigate back to the Steam directory and check if the AppID folder is back. If it is, it is confirmed that your Steam Cloud is working perfectly and we can proceed with the method.
Bringing Up Steam Cloud Conflict Dialogue
The first part of the solution is probably the most difficult. To delete all your Steam Cloud data, it is necessary to bring the conflict dialogue. Without it is not possible to delete the data present in your Cloud. Steam Cloud conflict occurs when the Cloud files differ from the data present on your hard drive.
There are two methods to bring about this conflict:
Method 1:
- Make sure that your Steam Cloud is enabled by following the steps mentioned above. Exit Steam completely by ending all the processes starting with Steamclientbootstrapper using the task manager.
- Now will alter all the files in the location
Steam\userdata\SteamID\AppID\remote
The objective is to make sure that all the files are different from those uploaded to the Steam cloud. We can’t simply delete the files from this location as Steam will automatically notice that the files are missing and download the same ones from the Cloud servers. We can achieve our task by corrupting them and making them 0-byte files.
- Navigate to
Steam\userdata\SteamID\AppID\remote
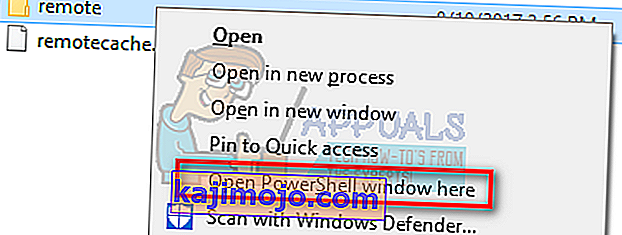
- Now hold shift and right-click on your remote folder. Select the option “Open PowerShell window here”.
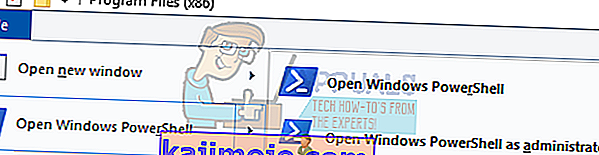
- You can also open PowerShell when in the folder by clicking the File option present at the top left side of the screen and selecting “Open Windows PowerShell as administrator”.
- Once PowerShell is opened, type the exact text written below


clc –path “C:\Program Files (x86)\Steam\userdata\SteamID\AppID\remote\*"
If you fail to write the correct code, you will get an error like this

If you correctly type in the line there will be no confirmatory message and you will get a window like this.

Start your Steam and there will be the conflict windows present on your Steam client.
Method 2:
This is an easier method as compared to the earlier one but it isn’t that efficient.
- Open your Steam client. Open its Settings by pressing the Steam button present at the top left corner of the window and selecting the option.
- Open the Cloud tab present on the left side of the screen. Uncheck the option “Enable Steam Cloud synchronization for the applications which support it”.

- Now navigate to your Stream directory as you did earlier and delete all files present in the folder of AppID. The file path for deletion is
Steam\userdata\SteamID\AppID.
- Now start the game to make new and different files in the file location.
- Exit the game and Steam completely by ending all Steam processes in the task manager (end steamclientbootstrapper first).
- Now delete the remotecache.vdf file present in the location
Steam\userdata\SteamID\AppID
- Start your Steam.
- Head over to the client’s Settings and enable the cloud.

Now a Steam conflict dialogue will come forth and we can proceed with the remaining method.
Deleting Cloud files
Once the Cloud conflict error is forth, don’t click any option and follow the instructions below.
- Navigate to the following file path
Steam\userdata\SteamID\AppID
and delete all the files in it. There will be two files (remote folder and remotecache.vdf). Delete both of them.

- Now go back to the conflict window and select the option of “Upload to the Steam Cloud”. Now Steam will sync your AppID folder while there will be nothing in it and the previous data on your Steam Cloud will be deleted.
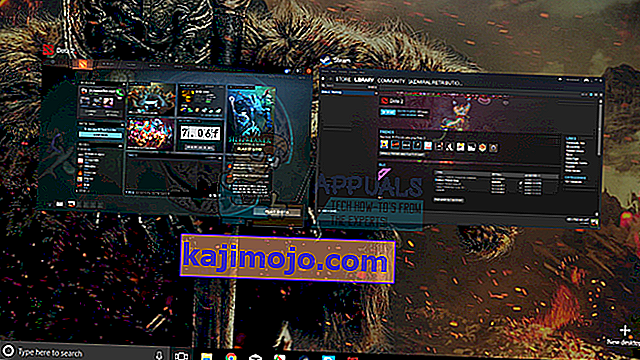
- Now the game will start automatically but it will create new files that will be synced to your Steam cloud when you close it. We can prevent it from happening by pressing alt + tab. This will open the open windows on your screen. Select the Steam client from the list of windows.
- Once you are in the Steam client, open the client’s Settings. Navigate to the Cloud tab and uncheck the line which enables cloud.
- Now return to the game and exit. No files will be synced to your Steam cloud.
- Exit Steam and delete the AppID folder as we did before.


How to Make Sure If it Worked?
Remember how we checked at the beginning of this method if the Steam Cloud was running as expected by deleting the AppID folder and checking if it was made again. If there is no file present in the Steam cloud, there will be no file downloaded to your computer.
- Enable the Steam cloud as we did in the guide.
- Exit Steam completely by using the task manager.
- Delete the AppID folder (if you didn’t in step 2).
- Now check D3 (these are the cloud files) and compare them with D2 (local files on your computer). If there is nothing in D3, there will be nothing in D2 too!
- Check the following directory Steam\userdata\SteamID
No new AppID folder would have been created.
You can also check by logging Steam in on another computer and checking if the files exist.
If you make it till here without any problems, you have successfully deleted all the files on your Steam Cloud.
How to Delete Steam Cloud Saves from OS X
The procedures above can also be replicated on OS X and older Macs to a slight extent. By following the steps below, you will be able to delete your local saves. You can then disable the Steam Cloud synchronization from the Steam application, start a new game and create a few new saves. Then, when you return to re-enable the Steam Cloud synchronization features, the client will ask you which saves do you want to use. You can then choose the new ones which will delete and replace your old saves from the cloud.
To make things even clearer, here’s a step-by-step guide through the whole thing:
- Open your Steam application and go to Steam > Settings via the ribbon at the top of the window.
- In the settings menu, click on the Cloud tab and uncheck the box associated with Enable Steam Cloud synchronization for applications that support it.
- Close Steam completely and open your Finder app.
- Go to Library > Application Support > Steam > SteamApps > Common and open the folder of whichever game you want to delete the save files.
- Next, open the SAVE folder to reveal the saves of the game.
Note: If the location specified above doesn’t land you to the save files, try the following locations but mind the placeholders:
Users / *Your username* /Library / Application Support / *Game Folder* / Game Documents / *Game* / GameSaves Users/ *Your username* / Library / Application Support / Steam / userdata / *GameNumber* / remote Users/ *Your username* / Library / Containers / *Game Folder* / Data /Library / Application Support / *Game* / GameDocuments / *Game* / gamesaves
- Once you manage to identify and delete the local saves from the game you’re targeting, open the Game and create a few new saves.
- Exit the game, open steam and return to Steam > Settings > Cloud. From the cloud tab, re-enable the checkbox next to Enable Steam Cloud synchronization for applications which support it and click the OK button below.
- Steam will ask you whether you want to use the newly created local saves or the ones that you already have on the cloud. Choosing to use the new ones will delete the old saves that you currently have on Steam Cloud.