A lot of Canon printer owners are receiving the “printer not responding” error while trying print a document under Windows 10 or an older version. The issue is usually restricted to users that attempt to print from a wireless Lan environment, but there are some occurrences with a wired connection.  Note: While some users are reporting getting this error with any document, some users report that the issue usually occurs with the second document that they try to print. After investigating the issue thoroughly, here’s a list of possible causes that might have triggered this message:
- The printer driver is configured with an improper port.
- An incorrect access point was selected during the initial setup.
- 3rd party firewall or antivirus software is interfering with the printer software.
- USB problem that refuses to establish contact under Windows (if a wired connection is used)
If you’re currently struggling with the “printer not responding” error, the following methods might help. We managed to identify quite a few potential fixes that have managed to help users in a similar situation to resolve the issue. Please follow each fix in order (and skip the ones that are not applicable) until you came upon a method that resolves your situation. Let’s begin!
Method 1: Rebooting your network connection
Before you dive into the more technical methods below, let’s eliminate the simple potential culprits from the list. Start by making sure your printer is properly connected to the same wireless network as your computer. If you’re using a wired connection, make sure the cable checks out. Once you got that figured out, restart your printer and then restart your network connection. The easiest way to do this is physically plugging the power cable out of the router/modem. Note: You can also make use of the reset button in order to reset your home network, but we advise against it if you’re not confident in your networking skills. 
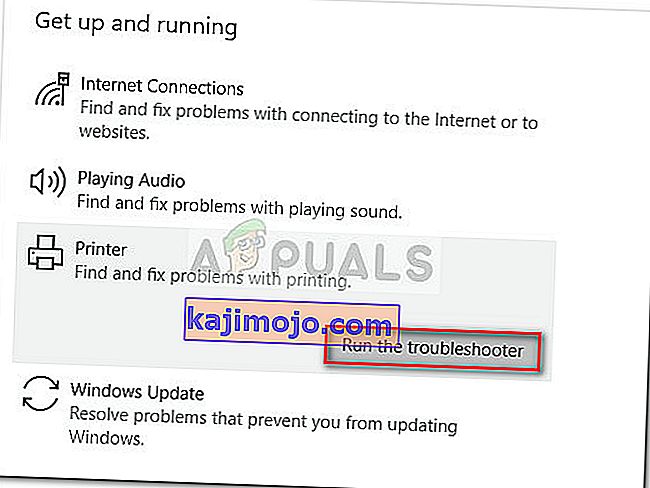
Method 2: Using the Printer Troubleshooter
Although Windows Troubleshooter is notoriously known for being unhelpful, the Printer Troubleshooter seems to have helped quite a few people to resolve the issue. Here’s a quick guide to launching the Windows Printer Troubleshooter and using it to resolve the “printer not responding” error:
- Press Windows key + R to open up a Run Box. Type “control.exe /name Microsoft.Troubleshooting” and hit Enter to open Windows Troubleshoot.

- In the Troubleshoot window, scroll down, click on Printer then select Run the troubleshooter.
- Wait until the troubleshooter detects the problems related to your printer drivers. If any inconsistencies are found, you will be asked if you want to follow the repair strategies. If that’s the case, click on Apply this fix and follow the on-screen instructions to complete the repair process.
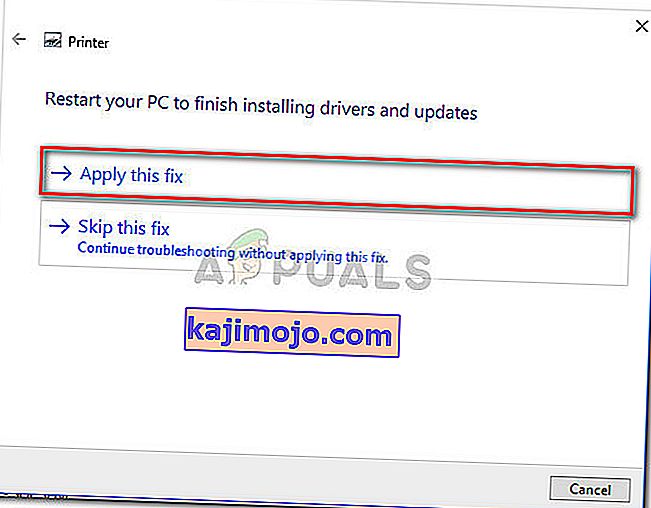
- Restart your computer and see if the issue has been resolved after the restart.


If the issue is not yet resolved, continue with the other methods below.
Method 3: Disabling 3rd party firewall or security suite
As mentioned at the beginning of the article, this issue is often times caused by an overprotective firewall. I’m not talking about the built-in solution (Windows Firewall) which is quite unrestrictive. This particular issue is a common occurence with 3rd party antivirus suites (such as Mc Affee, Avira, AVG, etc.) but it’s also reported to happen with dedicated firewalls (ZoneAlarm Free, Comodo Free Firewall, GlassWire, etc.). Most users encountering this issue report that their antivirus solution ended up blocking the spooler subsystem app which made the wireless connection inoperable. A lot of users have reported that the issue has been resolved by itself after they disabled the firewall function or uninstalling the security suite that was filtering the connections. As you can imagine, the exact steps towards disabling your 3rd party antivirus are very specific to the application that you’re using. But if you want a quick and easy solution, uninstall the application from Programs and Features. To do this, open a Run box (Windows key + R), type “appwiz.cpl” and hit Enter to open Program and Features. 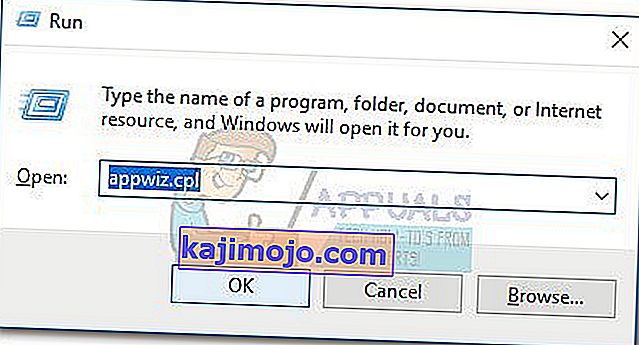 In the Programs and Features window, locate your 3rd party application, right-click on it and choose Uninstall to remove it from your system. Note: If you’re worried about leaving your system vulnerable, don’t be. Upon uninstalling the dedicated antivirus, Windows Firewall will automatically start monitoring your incoming & outgoing connections. If this method didn’t resolve the issue or it wasn’t applicable, move down to the method below.
Method 4: Change the USB port (wired connection only)
As some users have pointed out, this might very well be a USB issue if the printer is using a wired connection to communicate with your Windows computer. In order to test this theory, simply try another USB port, allow Windows to reinstall the drivers required by the printer, then restart your computer once again. At the next restart, see if the issue has been resolved. If the issue isn’t yet solved, disconnect the USB cable connecting your printer to your PC once again. Then, let’s take a look in Device Manager for any exclamation points related to your USB ports and printers. To do this, open a Run box (Windows key + R), type “devmgmt.msc” and hit Enter to open Device Manager.  In Device Manager, expand the drop-down menu associated with Universal Serial Bus controllers and see whether you manage to find any exclamation points near the icons. If you find any occurrence, right-click on the associated entry and choose Uninstall device. Repeat this procedure with every occurrence, then restart your computer again. At the next restart, connect your printer again to a different USB port and see if the connection is successful after Windows reinitiates the USB port by reapplying the driver. If you’re still facing the same issue, move over to the method below.
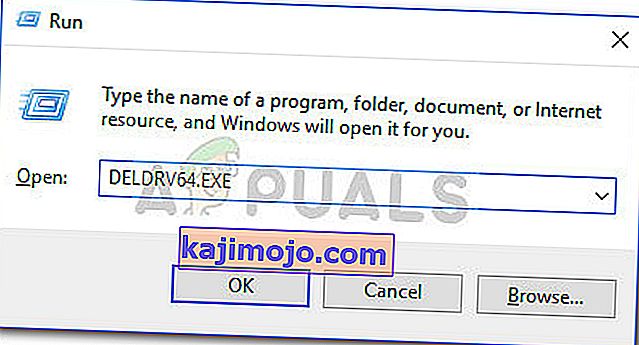
Method 5: Uninstalling Canon drivers via DELDRV64.EXE (wireless connection only)
If you’ve come this far without a result, let’s see if you’ll have better luck following the troubleshooting steps typically used by Canon technicians to resolve this type of issue. Some users have publicly posted the steps that they were instructed to follow after calling support. This procedure involves using the dedicated uninstaller to remove the printer driver, inserting the WEP key on your printer and then reinstalling the appropriate canon driver from the official download page. Here’s a quick guide through the whole thing:
- Press Windows key + R to open up a Run box. Then, type “DELDRV64.EXE” and hit Enter to open Canon’s uninstaller. Next, follow the on-screen prompts to remove the driver from your system and restart your computer to complete the process.
- On your printer, enter the WEP key (password) of your wireless network and make sure it’s properly connected to your home/work network.
- Visit this link (here) and download the appropriate printer driver according to your OS version.
- Open the installer of the driver and follow the prompts to complete the installation.
- Perform a final computer restart and see if the issue has been resolved.
