Το Rainbow Six Siege είναι ένας φοβερός τακτικός παίκτης πολλαπλών παικτών που αναπτύχθηκε και δημοσιεύθηκε από την Ubisoft. Η εστίασή του στην καταστροφή του περιβάλλοντος και η συνεργασία μεταξύ των μελών της ομάδας το ξεκίνησε με επιτυχία, αλλά πολλοί χρήστες απέτυχαν να απολαύσουν το τακτικό πλεονέκτημα της χρήσης φωνητικής συνομιλίας καθώς απλά δεν λειτουργεί στο παιχνίδι.

Υπήρξαν πολλές διαφορετικές μέθοδοι που έχουν χρησιμοποιήσει οι παίκτες για να επιλύσουν το πρόβλημα όλα αυτά τα χρόνια και αποφασίσαμε να συγκεντρώσουμε τις πιο χρήσιμες και να παρέχουμε βήμα-προς-βήμα οδηγίες. Ακολουθήστε τα παρακάτω προσεκτικά και το πρόβλημα δεν πρέπει να λυθεί αμέσως!
Τι προκαλεί τη μη συνομιλία μέσω φωνής στο Rainbow Six Siege;
Αυτό το πρόβλημα έχει μια μεγάλη λίστα πιθανών αιτίων που μπορούν να αποδοθούν σε αυτό. Σας συνιστούμε να ελέγξετε τις αιτίες για να προσδιορίσετε το σενάριό σας και ενδεχομένως να επιλύσετε το πρόβλημα πιο γρήγορα από το συνηθισμένο. Δείτε την πλήρη λίστα παρακάτω!
- Χωρίς προεπιλεγμένη συσκευή εγγραφής - Μια συσκευή εγγραφής πρέπει να επιλεγεί ως προεπιλογή στον υπολογιστή σας. Αυτό θα σηματοδοτήσει το παιχνίδι σε ποια συσκευή θα έχει πρόσβαση και το πρόβλημα θα σταματήσει να εμφανίζεται.
- Ζητήματα προστασίας από ιούς - Ορισμένα εργαλεία προστασίας από ιούς ενδέχεται να εμποδίσουν την πρόσβαση του παιχνιδιού στο υλικό σας και ίσως χρειαστεί να το προσθέσετε στη λίστα εξαιρέσεων για την επίλυση του προβλήματος.
- Προγράμματα οδήγησης ήχου - Τα εγκατεστημένα προγράμματα οδήγησης ήχου ενδέχεται να είναι πολύ παλιά ή κατεστραμμένα. Αυτό μπορεί να προκαλέσει κάθε είδους προβλήματα ήχου και σας συνιστούμε να τα ενημερώσετε το συντομότερο δυνατό.
- Asus Sonic Studio - Αυτό είναι ένα πρόγραμμα που αναφέρθηκε ότι δεν λειτουργεί καλά μαζί με τις ρυθμίσεις φωνητικής συνομιλίας του παιχνιδιού, οπότε σας συνιστούμε να το απεγκαταστήσετε απλώς εάν δεν εξαρτάστε από αυτό.
- Διεύθυνση DNS - Αυτό μπορεί να φαίνεται περίεργο αλλά αλλάζοντας την προεπιλεγμένη διεύθυνση DNS που χρησιμοποιεί ο υπολογιστής σας για να επιλύσει το πρόβλημα για πολλούς χρήστες!
Λύση 1: Επιλέξτε μια προεπιλεγμένη συσκευή εγγραφής
Πολλοί χρήστες ανέφεραν ότι το πρόβλημα προκλήθηκε από το γεγονός ότι καμία συσκευή δεν επιλέχθηκε ως προεπιλεγμένη συσκευή εγγραφής. Μπορείτε να το επιλύσετε αρκετά εύκολα και αυτό είναι που κάνει αυτή τη μέθοδο τόσο χρήσιμη. Θα διαρκέσει μόνο ένα λεπτό και έχει μεγάλες πιθανότητες να επιλύσει το πρόβλημά σας σε μια στιγμή. Ακολουθήστε τα παρακάτω βήματα για να επιλέξετε την προεπιλεγμένη συσκευή εγγραφής!
- Κάντε δεξί κλικ στο εικονίδιο ηχείων στο κάτω δεξί μέρος της οθόνης σας. Βρίσκεται στο δίσκο συστήματος στο δεξί μέρος της γραμμής εργασιών σας. Επιλέξτε Ήχοι από το μενού περιβάλλοντος που θα εμφανιστεί.

- Εναλλακτικά, μπορείτε να χρησιμοποιήσετε το συνδυασμό πλήκτρων Win Key + R για να ανοίξετε το παράθυρο διαλόγου Εκτέλεση . Μέσα στο κουτί, πληκτρολογήστε " control " και κάντε κλικ στο κουμπί OK για να ανοίξετε τον Πίνακα Ελέγχου . Ακόμα πιο εύκολα, μπορείτε απλά να αναζητήσετε τον Πίνακα Ελέγχου με ανοιχτό το μενού Έναρξη.
- Μόλις μπείτε στον Πίνακα Ελέγχου, αλλάξτε την επιλογή Προβολή κατά σε Μεγάλα ή Μικρά εικονίδια στο πάνω δεξί μέρος της οθόνης σας. Κάντε κύλιση προς τα κάτω μέχρι να φτάσετε στην επιλογή Ήχοι μέσα. Κάντε αριστερό κλικ για να το ανοίξετε.

- Τέλος πάντων, μεταβείτε στην καρτέλα Εγγραφή στο παράθυρο Ήχος και αναζητήστε την κύρια συσκευή εγγραφής σας. Θα πρέπει να έχει ένα πράσινο σημάδι επιλογής στο κάτω δεξί μέρος του εικονιδίου του. Κάντε αριστερό κλικ για να το επιλέξετε και κάντε κλικ στο κουμπί Ορισμός προεπιλογής παρακάτω. Κάντε κλικ στο OK για να επιβεβαιώσετε τις αλλαγές σας και ελέγξτε αν η φωνητική συνομιλία αρχίζει να λειτουργεί στο Rainbow Six Siege!
Λύση 2: Προσθέστε το Rainbow Six Siege ως εξαίρεση στο Antivirus σας
Οι χρήστες ανέφεραν ότι έχουν προβλήματα προστασίας από ιούς σχετικά με το παιχνίδι. Φυσικά, το παιχνίδι δεν είναι κακόβουλο, αλλά αυτό είναι κάτι αρκετά δύσκολο να αποδειχθεί στο λογισμικό ασφαλείας. Ωστόσο, η απεγκατάσταση θα πρέπει να είναι η τελευταία λύση. Πριν από αυτό, μπορείτε να προσθέσετε μια εξαίρεση για το εκτελέσιμο ή το φάκελο του παιχνιδιού και το antivirus θα πρέπει να το επιτρέπει κάθε φορά που εκτελείται. Ακολουθήστε τα παρακάτω βήματα και ελέγξτε αν κατάφερε να επιλύσει το πρόβλημά σας!
- Ανοίξτε τον υπολογιστή - πελάτη προστασίας από ιούς κάνοντας διπλό κλικ στο εικονίδιο που είναι διαθέσιμο στο δίσκο συστήματος (δεξιά μέρος της γραμμής εργασιών στο κάτω μέρος του παραθύρου) ή αναζητώντας το στο μενού Έναρξη ή μετά το άνοιγμα Search / Cortana.
- Η επιλογή Εξαιρέσεις ή Εξαιρέσεις βρίσκεται σε διαφορετικά μέρη όταν πρόκειται για διαφορετικά εργαλεία προστασίας από ιούς. Συχνά μπορεί να βρεθεί εύκολα χωρίς πολλή ταλαιπωρία, αλλά εδώ είναι μερικά γρήγορα βήματα για το πώς να το βρείτε στα πιο δημοφιλή εργαλεία προστασίας από ιούς τρίτων:
Kaspersky Internet Security : Αρχική σελίδα >> Ρυθμίσεις >> Πρόσθετα >> Απειλές και εξαιρέσεις >> Εξαιρέσεις >> Καθορίστε αξιόπιστες εφαρμογές >> Προσθήκη.

AVG : Αρχική σελίδα >> Ρυθμίσεις >> Εξαρτήματα >> Ασπίδα Ιστού >> Εξαιρέσεις.

Avast : Αρχική σελίδα >> Ρυθμίσεις >> Γενικά >> Εξαιρέσεις.

- Θα πρέπει να προσθέσετε το Rainbow Six Siege εκτελέσιμο ή φάκελο στο πλαίσιο που θα σας ζητά να πλοηγηθείτε στο παιχνίδι. Το εκτελέσιμο θα πρέπει να βρίσκεται στον ίδιο φάκελο όπου αποφασίσατε να εγκαταστήσετε το παιχνίδι. Από προεπιλογή, είναι:
C: \ Program Files (x86) \ Steam \ steamapps \ common
- Ελέγξτε αν μπορείτε πλέον να παίξετε το παιχνίδι και να χρησιμοποιήσετε σωστά τη φωνητική συνομιλία. Εάν εξακολουθεί να μην λειτουργεί, δοκιμάστε να επανεκκινήσετε τον υπολογιστή σας και δοκιμάστε ξανά. Το τελευταίο βήμα θα ήταν να απεγκαταστήσετε το πρόγραμμα προστασίας από ιούς και να δοκιμάσετε ένα διαφορετικό εάν το πρόβλημα εξακολουθεί να εμφανίζεται.
Λύση 3: Επανεγκαταστήστε τα προγράμματα οδήγησης ήχου και ενημερώστε τα στην πιο πρόσφατη έκδοση
Τέτοια προβλήματα μικροφώνου προκαλούνται συχνά από προγράμματα οδήγησης συσκευών ήχου και θα πρέπει να εξετάσετε το ενδεχόμενο να τα ενημερώσετε, ειδικά εάν δεν το έχετε κάνει εδώ και καιρό. Με αυτόν τον τρόπο, μπορείτε να απεγκαταστήσετε τα τρέχοντα προγράμματα οδήγησης που ενδέχεται να προκαλούν αυτό το πρόβλημα και να εγκαταστήσετε νέα, νέα προγράμματα οδήγησης που ενδέχεται να μην προκαλέσουν την εμφάνιση αυτού του σφάλματος. Βεβαιωθείτε ότι ακολουθείτε τα παρακάτω βήματα!
- Πρώτα απ 'όλα, θα πρέπει να ανοίξετε τη Διαχείριση συσκευών . Πατήστε τα πλήκτρα Windows και R ταυτόχρονα και πληκτρολογήστε " devmgmt. msc "στο πλαίσιο που θα ανοίξει τη Διαχείριση Συσκευών.
- Μπορείτε επίσης να αναζητήσετε τη Διαχείριση συσκευών κάνοντας κλικ στο κουμπί μενού Έναρξη στο κάτω αριστερό μέρος της οθόνης, στο πλήκτρο Windows ή στο Search / Cortana Απλώς πληκτρολογήστε " Device Manager " στη συνέχεια και κάντε αριστερό κλικ στο πρώτο αποτέλεσμα.

- Μετά από αυτό, αναπτύξτε την ενότητα Ελεγκτές ήχου, βίντεο και παιχνιδιών , κάντε δεξί κλικ στην κύρια συσκευή ήχου και επιλέξτε την επιλογή Κατάργηση εγκατάστασης συσκευής από το μενού περιβάλλοντος που θα εμφανιστεί. Επίσης, βεβαιωθείτε ότι επιβεβαιώνετε τυχόν προτροπές που σας ζητούν να επιβεβαιώσετε την επιλογή σας.

- You can now visit your manufacturer’s website and look for drivers manually. Enter the required data about your computer and your operating system, and download the latest driver. Run the installer on your computer, follow the instructions on-screen, and that’s it.
- Alternatively, you can simply click the Action option at the menu bar at the top of the window and choose the Scan for hardware changes option inside. It will find that you have uninstalled a driver and the latest one found by Windows will be installed automatically.

- Reopen Rainbow Six Siege and check to see if voice chat has started working!
Solution 4: Update Windows to the Latest Version
There are pros and cons when it comes to Windows Update. It often breaks as many things as it’s able to fix. In this particle scenario, Windows Update is seen as a savior as many users were able to resolve the problem simply by downloading and installing the latest updates to Windows 10. Make sure you follow the steps below to do the same and, hopefully, resolve the problem.
- Open Settings by clicking the Start menu button and click the cog icon in the bottom left corner. Alternatively, you can simply search for Settings in the Start menu or use the Windows Key + I key combination.

- Inside the Settings app, click to open the Update & Security Make sure you stay in the Windows Update tab. If no updates are being displayed inside, click the Check for updates button to look for more.
- If there are updates ready to be installed or if the search from Step 2 find a new version of Windows to update to, its description should be available below, along with the Download and install now

- Click this button and wait for windows to finish downloading and installing the update. You will probably need to restart your computer to complete the download. Check to see if the problem is resolved afterward!
Solution 5: Uninstall Asus Sonic Studio
If you are an Asus user and if you have this program installed on your computer, you should consider uninstalling it. It’s an audio manager for Asus devices and many users have reported voice chat problems with Rainbow Six Siege with this program installed. Follow the instructions below to uninstall it completely!
Windows 10:
- Open Settings by clicking the Start menu button and click the cog icon in the bottom left corner. Alternatively, you can simply search for Settings in the Start menu or use the Windows Key + I key combination.

- Once inside, click to open the Apps section which should immediately list all programs you have installed on your computer. Locate the Asus Sonic Studio entry in the list, left-click its entry once, and select the Uninstall button which will appear.
- Follow the instructions which will appear on the screen in order to complete the uninstallation wizard.
Other versions of Windows:
- On other Windows versions, you can use the Win Key + R key combination to open the Run dialog box. Inside the box, type “control.exe” and click the OK button to open the Control Panel. Even more easily, you can simply search for Control Panel with the Start menu open.

- Once inside Control Panel, change the View by option to Category at the top right part of your screen. Click the Uninstall a program button under the Programs section in Control Panel.

- Locate Asus Sonic Studio in the list of installed programs on your computer, left-click to select it, and click the Uninstall button from the menu above. You can also right-click its entry and choose Uninstall from the context menu which will appear.
- Once again, follow the instructions on-screen to uninstall it and check to see if voice chat has started working while playing Rainbow Six Siege.
Solution 6: Edit the Configuration File
If you are unable to resolve the problem in-game or by any of the methods we have presented above, there is an easy way to attempt a solution by simply editing a configuration file located in your Documents folder. This should reset the voice chat capture mode and you should be good to go. Make sure you follow the instructions below carefully!
- Make sure the game is closed before proceeding! Locate the This PC entry on your Desktop and double-click to open it. Alternatively, you can simply open a folder on your computer and left-click This PC from the navigation menu at the left side of the folder window.

- Anyway, under the Devices and drives section inside This PC, make sure you double click your Local Disk (C:) Navigate to Users >> YourUserName >> Documents >> My Games >> Rainbow Six – Siege.
- Once inside the Rainbow Six – Siege folder, make sure you open the folder named like your UplayID. It might be a seemingly random string of letters and numbers if you haven’t set up your ID properly. Open this folder.

- Inside this folder, right-click the GameSettings configuration file and choose to open it with a text editor such as Notepad. Other text editors are okay as well.
- After opening it, use the Ctrl + F key combination to open the Find You can also click Edit from the menu bar at the top of the window and choose Find from the menu which will appear.

- In the Find what text box, make sure you type “VoiceChatCaptureMode”. Change the number next to this option to 1. Use the Ctrl + S key combination to save the changes or click File >> Save. Reopen the game and check to see if the same problem still appears!
Solution 7: Decrease the Voice Chat Record Threshold
This is a simple in-game setting which was driving players mad for a long time. Basically, if the threshold is set too high, you won’t be able to use voice chat properly. All you need to do to resolve the problem is to decrease the voice chat record threshold by following the steps we have prepared below.
- Open the game by double-clicking its icon on the Desktop. If it’s installed via Steam, open your Steam client from the Desktop or by searching for it in the Start menu or the Search/Cortana window and left-click the first result which will appear.

- Once the Steam client opens, click the Library button from the top of the window, right-click the Rainbow Six Siege entry in the list of games you have installed, and choose Play Game from the context menu which appears.
- Once the game’s home screen appears, click the cogs icon at the top right part of the screen and choose Options from the dropdown menu.

- Navigate to the Audio tab inside the options section and look for the Voice Chat Record Threshold Make sure you decrease it from its high value to something around 20. Click the Apply button below and check to see if voice chat has started working properly!
Solution 8: Use Cloudflare’s DNS Address
Changing the default DNS address your computer uses to connect to the Internet with the free one provided by Cloudflare can resolve the voice chat issue with the game. Many users have benefitted from this method and you can easily be one of them if you follow the instructions below!
- Use the Windows Key + R key combination to open the Run dialog box. Type “ncpa.cpl” inside the bow without the quotation marks and click OK.

- Alternatively, you can search for Control Panel in the Start menu and left-click the first result. Change the View by option inside Control Panel to Category and click the Network and Internet section to open it.
- Once inside, click to open the Network and Sharing Center. From the left-side menu, choose the Change adapter settings

- Anyway, right-click the network adapter you use to connect to the Internet and choose Properties from the context menu which will appear.
- Locate the Internet Protocol Version 4 (TCP/IPv4) entry in the “This connection uses the following items” list, left-click to select it, and click the Properties button below.

- Change the second radio button to Use the following DNS server addresses. Set the Preferred DNS server to 1.1.1.1 and the Alternate DNS server to 1.0.0.1 and check the Validate settings upon exit box.

- Apply the changes you have made by clicking the OK button and check to see if voice chat has started working properly!
Solution 9: Enabling Stereo Mix
In some cases, the stereo mix feature from the recording panel might be disabled due to which this error is being encountered. Therefore, in this step, first, we will enable the stereo mix and then change the recording quality of the microphone to work more smoothly with the game. For that:
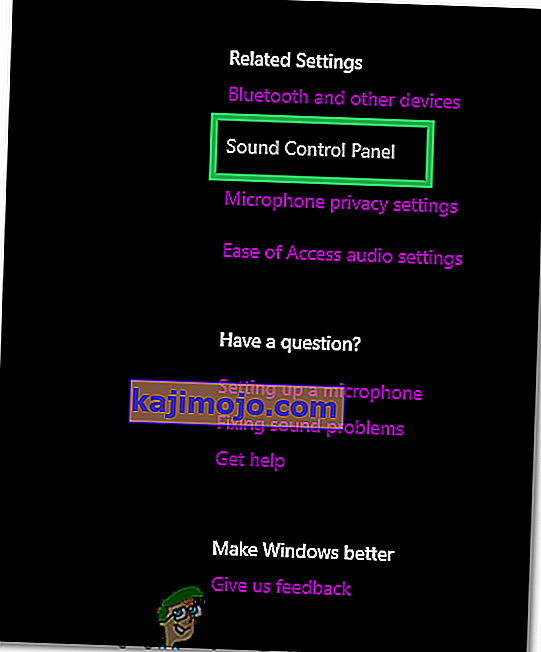
- Navigate to your desktop and right-click on the “Speaker” icon on the bottom right of the system tray.
- Select “Open Sound Settings” and then click on the “Sound Control Panel” button.
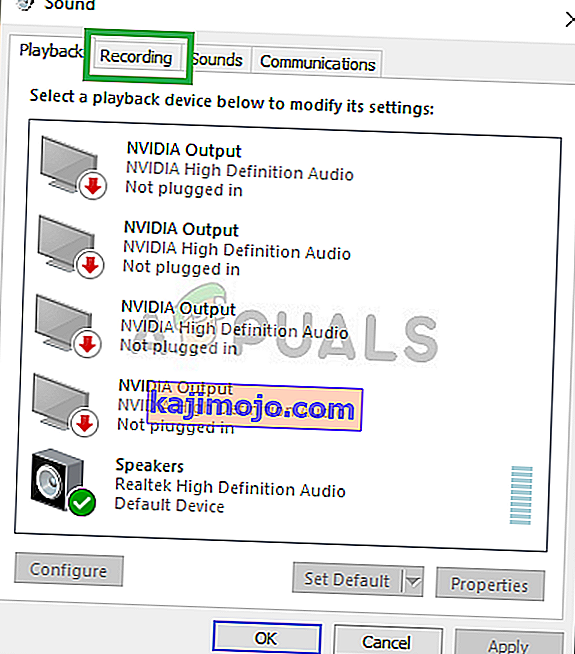
- Once in the sound control panel, click on the “Recording Tab” and in this tab, right-click on the “Stereo Mix” option and select “Enable”.
- Now right-click on your microphone in the recording tab and select “Properties”.
- Go to “Advanced’ and click on the “Quality” dropdown.
- From here, select the very first option in the list and then start the game. Start going downwards across the list one by one until you find one that fixes the error.
- Check to see if the issue persists.


Solution 10: Configuring Microphone Privacy
In some cases, the Microphone privacy settings might be preventing it from working during the gameplay. Therefore, in this step, we will be changing some WIndows’ Privacy settings in order to allow the recording of your voice. For that:
- Press “Windows” + “I” to open the settings.
- Click on “Privacy” and then select “Microphone” from the left pane.
- Click on the “Allows Apps to Access Microphone” toggle and then scroll down to allow apps to access your microphone.
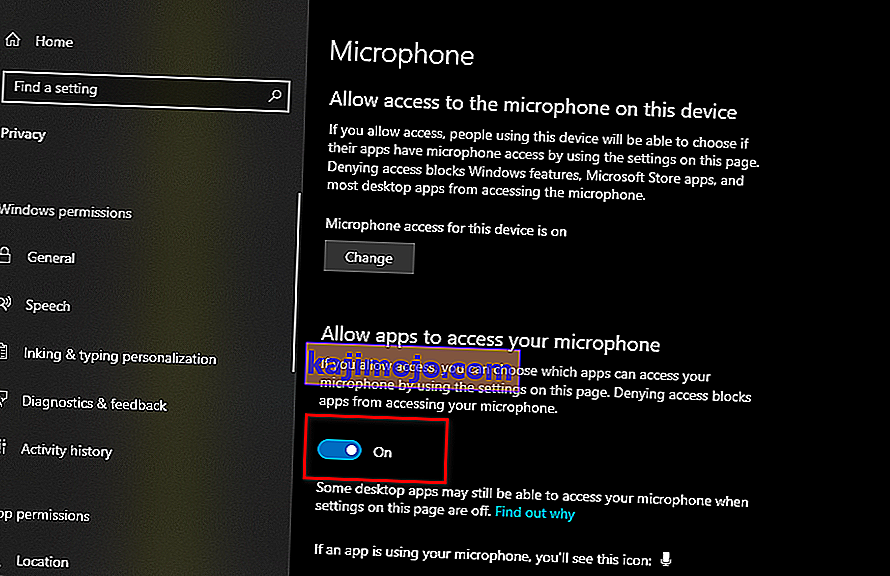
- Turn ON the toggle in front of individual apps as well which you intend to use for VOIP.
- Check to see if the issue persists.

If the issue still persists and you are all that determined to get it fixed, the only workaround left is to perform a reinstall of Windows and check if that fixes your issue.